Doing any kind of benchmarking in a way that is really measuring the right metric we’re after in a reproducible and comparable manner is not easy.
Firing up your favourite application, starting some encoding/decoding process and looking at the wall clock and/or rough CPU % usage figures in the Task Manager is not really a scientific way to do video codec benchmarking, for multiple reasons.
To do any sort of reliable, comparable benchmarking, there are 3 important things we have to be after:
- Compare similar things.
That is, make sure we are not comparing apples to oranges. A prime example would be to compare a lossless codec to a streaming codec, or comparing 2 lossless codecs but one of them doing RGB -> YUV 4:2:0 compression with internal conversion while the other YUV 4:2:2 direct compression without any conversion. - Under identical circumstances.
That is, using the same machine, and most importantly, the same environment (no other programs running), and CPU locked both in number of cores and frequencies. We’ll get back to why this is crucial and sometimes hard to ensure in a minute. - Measuring the right thing.
That is, we actually measure what we are after, in this case codec-only processing time and not hard-disk read/write speed by accident.
Compare similar things
This is rather easy to verify, we only have to make sure the codecs are set up correctly, they have the same input and perform the same color space conversion internally if needed.
Identical circumstances
This sounds easier than it is. In part, it is easy, we just have to close all running applications, browsers, preferably disabling background services like updates and file indexing, etc.
Locking the CPU frequency and cores might not be immediately obvious why is it needed. The problem is caused by power saving and performance boosting technologies like Intel Turbo Boost or AMD Turbo Core.
Take the example of running a video encoding benchmark, reading a raw video file from disk. In power saving mode, the CPU will operate at a low MHz frequency. While the app is busy reading a frame from disk, the CPU is idle, remaining in low MHz frequencies, then as encoding of the frame begins, it will scale up. This is not instant however, so encoding the frame happens at a non-constant CPU frequency. Then disk reading comes, so the CPU will enter power saving again. So during the whole process, the CPU will constantly scale up and down, influenced by the disk reading speed. Running the benchmark a second time however, the operating system might have cached the file into RAM, so disk reading is instant (from cache) so the CPU cannot fully enter power saving, and our measurements will be different from the first run, as the CPU runs at different speeds in the two cases.
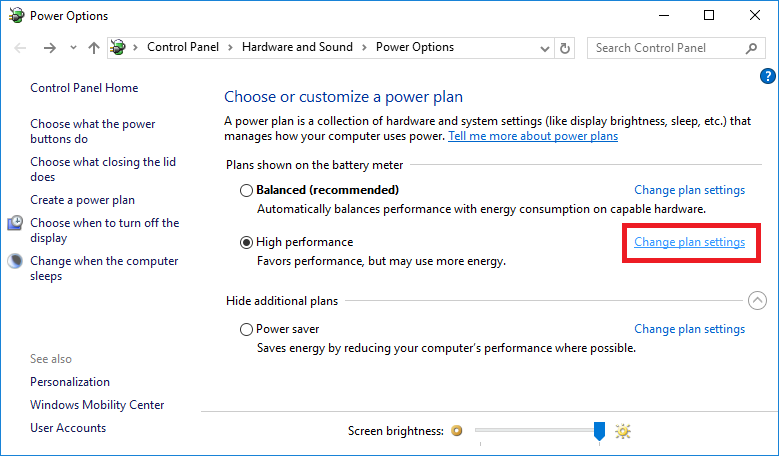
Disabling power saving mode (by selecting “High Performance” mode in power options) is only a half-solution, as the same thing happens with performance boosting. Modern CPUs will dynamically overclock themselves for short periods of time if temperature allows. Using the same example as above, this will result in the CPU doing an overclock-normal-overclock-normal cycle, and if disk reading is slow, frames will mostly be encoded in overclock mode, while the second time (reading from cache) frames will be encoded at normal MHz CPU speed.
To get comparable results from our benchmark for each run, the effects of dynamic CPU frequency scaling must be eliminated. This means disabling power saving and performance boosting modes.
As noted earlier, setting the system to “High performance” mode in Power Options is only half of the solution, as it prevents CPU frequency down-scaling but not overclocking.
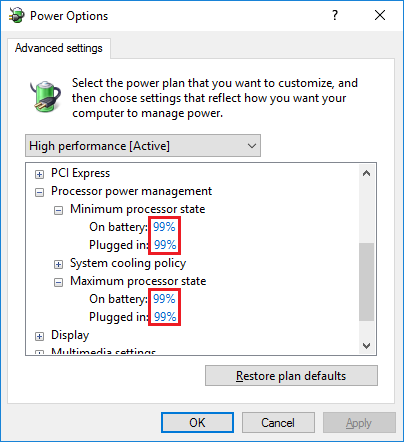
An easy trick to prevent Turbo Boost from kicking in is to set both the “Minimum/Maximum Processor State” in Advanced power settings to 99% instead of 100%. This locks the CPU close to it’s nominal rated frequency. There are other ways to do this, like going into the BIOS settings, however this is the easiest method I’ve found.

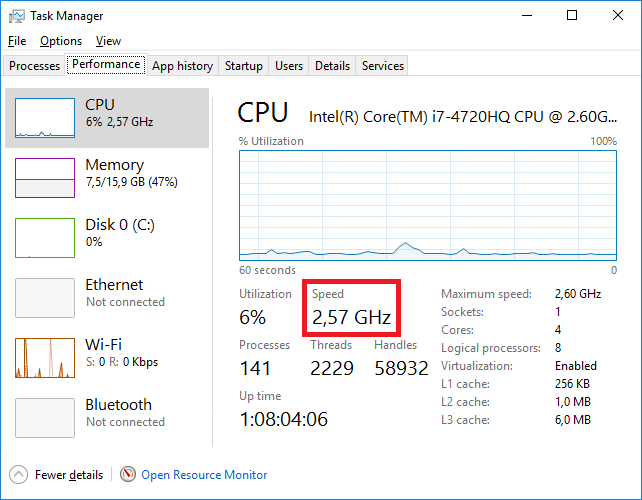
To verify it is locked, open Task Manager, click More Details and select the Performance tab. During the whole benchmark process, the CPU Speed shown in Task Manager must not change.
Measuring the right thing
This seems obvious, yet so many articles get this completely wrong. Whatever we are benchmarking, it is important to measure only what we are after. In a video encoding process, there can be a lot of steps, including:
- reading from disk
- decompression
- various conversions and processing
- compression
- writing to disk
If we only want to measure compression performance, we have to make sure that we time only that part of the whole process accurately. This is so simple, yet if you look up various benchmarks in the wild most of them don’t even eliminate disk I/O, the most obvious of them all.
Unfortunately, there aren’t too many programs that can accurately measure codec-only processing time. So I developed a program which does exactly that: codecbench
Codecbench
Codecbench is a small free command-line program which can do encode/decode cycles from raw video files and time the performance of the codec being used. It can use any installed Video For Windows codec, so you can benchmark any codec installed in the system.
It is available on GitHub: https://github.com/ignus2/codecbench/releases
Codecbench needs raw video files as input, and has it’s own primitive raw-like compressed format (I call it craw, it is basically compressed frames one-after-another and some minimal header tucked at the beginning). The easiest way to produce raw video files is with ffmpeg. So download the ffmpeg binaries if you don’t have them already (get the static build): https://ffmpeg.zeranoe.com/builds/
Next we need some video material. An excellent source is the Tears of Steel open movie. It has all frames available in 4k tiff format: https://media.xiph.org/tearsofsteel/tearsofsteel-4k-tiff/
I used every 100th frame, but any number will suffice, download at least 20 at random (except the first few hundred frames, those are black). Then rename the downloaded files like so: frame00001.tif, frame00002.tif, frame00003.tif, etc.
Now we’ll use ffmpeg to convert the tiffs to a raw video file. Copy ffmpeg.exe into the same directory as the tiffs, then open a cmd prompt and type:
ffmpeg.exe -i frame%05d.tif -pix_fmt bgr24 -f rawvideo -vf scale=3840:2160 4k_bgr24.raw
This will convert the tiffs to 8bit RGB and resize them to UHD resolution and write a raw video file called 4k_bgr24.raw. This will squish the image a bit, but that’s OK, we only do this so that we’ll have the common 3840 x 2160 resolution video instead of widescreen 4096 x 1714.
Now we can start using codecbench. Copy the codecbench32/64.exe to the same directory, and run it without parameters to print it’s usage info:
codecbench64.exe
To do a quick encode benchmark, type the following. Note that we need to specify the frame size and pixel format exactly, as the raw video file has no header!
codecbench64.exe -rawin -i 4k_bgr24.raw -f bgr24 -w 3840 -h 2160 -loop 20
A codec selection dialog will pop up, select your codec and press OK. It will do an encode cycle (looped 20 times) and print something like:
INFO: Input file          : [RAW] 4k_bgr24.raw
INFO: Input format        : 3840 x 2160 [RGB24] 24 bpp
INFO: Decompressor        : -
INFO: Compressor          : 'MagicYUV YUV420' - 'MagicYUV - YUV 4:2:0'
INFO: Output format       : 3840 x 2160 [M8Y0] 24 bpp
INFO: Output file         : -

F: 400 | Compress: 104.9 fps (2488.7 MiB/s) (ratio: 6.83)
The fps above is the timing of the codec encoding only, without disk I/O or any other processing.
To benchmark decoding, we first create a compressed file, this time without the -loop switch but specifying the output (I use the .craw extension for the compressed file):
codecbench64.exe -rawin -i 4k_bgr24.raw -f bgr24 -w 3840 -h 2160 -o 4k_comp.craw
After it’s done, we can run a decode benchmark like so (this time, we don’t have to specify the frame size, as it is stored inside the header of .craw):
codecbench64.exe -i 4k_comp.craw -nc -loop 20
The -nc (no compress) switch tells it not to encode the decoded output again, just decode. We also throw away the decompressed data. The output will be something like:
INFO: Input file          : 4k_comp.craw
INFO: Input format        : 3840 x 2160 [M8Y0] 24 bpp
INFO: Decompressor        : 'MagicYUV YUV420' - 'MagicYUV - YUV 4:2:0'
INFO: Decompressed format : 3840 x 2160 [YV12] 12 bpp
INFO: Compressor          : -
INFO: Output format       : 3840 x 2160 [YV12] 12 bpp
INFO: Output file         : -

F: 400 | Decompress: 281.0 fps (3334.1 MiB/s) (ratio: 3.41)
Again, the measured framerate is the decoder-only performance. By default it decodes whatever the codec decides, this time it decoded as YV12. We can request the decode format with the -f switch like so:
codecbench64.exe -i 4k_comp.craw -nc -loop 20 -f bgr24
codecbench64.exe -i 4k_comp.craw -nc -loop 20 -f YUY2
...
This will make the codec perform the conversion internally.
So there you have it, an accurate and reproducible method to compare video codec performance.
As noted earlier, it is very important to lock your CPU cores and frequency! Be sure to verify using the Task Manager.
The source code of codecbench is available on github, along with pre-built binary releases: https://github.com/ignus2/codecbench